February Gardening Chores

Use downed trees as flower borders; as they break down, they will improve soil. (Photo by  Charlotte Ekker Wiggins)

Use downed trees as flower borders; as they break down, they will improve soil. (Photo by
Charlotte Ekker Wiggins)

February Gardening Chores

We’re in the throes of another warm spell, temperatures nudging 60F and encouraging my fruit trees, and bees, to be out in the garden early. Almost two months early. Some of our big box stores are also setting up for spring fever early, two of them already have seed offerings and seed starting kits for sale.

I live in USDA Hardiness Zone 5b-6A, inching more towards 6A based on this winter.. The following are my February gardening chores:

  • Locate downed tree trunks and use them to border flower beds. As the tree trunks decompose, they will improve the soil.

  • Pressure is on so if you haven’t made a dent in your reading pile, get a start, spring is only two months away. With our rapidly changing and more erratic climate patterns, the forecast is for an earlier spring.

  •  If you haven’t ordered your favorite gardening catalogs, get them ordered. Look for catalogs with detailed plant descriptions and good photographs so you can use them for reference.  Missouri Wildflowers Catalog has lovely pictures, even old catalogs are still good references. www.mowildflowers.net. For heirloom seeds, try Baker Creek Heirloom Seeds at www.rareseeds.com, both are Missouri nurseries.

  • Review last year’s garden diary entries. If you’ve missed a few entries, add them now. Underline items you wanted to get done this year. I make a list, then decide which projects I want to tackle. I also carry over the ones I didn’t get to last year, or drop them off the master list. This is a good time to dream.

  • Focus on adding native plants. Once established, they will be low care and tend to require less water than other plants and they will feed the native pollinators. They are connected. Check out George O. White State Forest Nursery, they may still have some seedlings left. Order even if they say sold out, you may still get the seedlings if the previous person didn’t pay for their order.

  • Read. I keep a pile of gardening books from our local library’s semi-annual book sale just for snowy, cold winter days.

  • On warm days, remember to water mums planted this past year. New mums need a gallon a month to keep their roots moist their first year. Once established, mums will become perennials and deter bugs from around where they are planted.

  • Pile mulch and leaves on garden beds if they’ve been blown off by winter winds.

  • Check inside plants for any hitchhiking bugs and remove. Make sure they are getting their sunlight needs met. If not, move them. Water with diluted fertilizer. Prune as necessary.

  • Drop your garden pruners and other garden tools off to get sharpened, this is a slow time of year and this will give you a head start on the season.

  • When feeding birds, add a little sand in the bird feeder mix. Birds need sand to help them digest seeds. Also ensure they have an available water source. Feed suet on cold days.

  • If you have fish in an outside pond, make sure it has a hole in the ice so fish will get oxygen.

Signs of spring around the corner, daffodil bulbs popping up! (Photo by Charlotte Ekker Wiggins)

Signs of spring around the corner, daffodil bulbs popping up! (Photo by Charlotte Ekker Wiggins)

There are signs of spring in my garden, daffodil bulbs are popping up. Only 50 days until spring!

Charlotte

Cardboard Flower Bed

cardboard flower bed pre.jpg

Cardboard Flower Bed

Who would have ever guessed our love affair with home delivery would morph into a gardening technique. That’s what is happening, though with the proliferance of cardboard and the desire, at least on my part, to have yet another flower bed on my limestone hillside.

Cardboard has been an excellent gardening tool for a number of years. I have used cardboard in the bottom of newly-dug holes to keep seedlings watered. I have also mulched established plants first with cardboard, then covered them in seasoned wooden chips.

Now cardboard in my garden has graduated into getting new full-fledged flower beds ready for planting.

It doesn’t have to be large pieces, any size cardboard box will do.

Saving a small stash of cardboard to move it out to my garden. (Photo by Charlotte Ekker Wiggins)

Saving a small stash of cardboard to move it out to my garden. (Photo by Charlotte Ekker Wiggins)

When gardening on a hillside, the critical part is having something to place on the cardboard so that it doesn’t blow away.

When I think I have enough cardboard to cover a garden area, I either collect bags of shredded leaves or already have shredded leaves in the area. That way I can cover the cardboard with the shredded leaves so they hold down the cardboard.

Leaves also make good choices to keep cardboard from blowing away. (Photo by Charlotte Ekker Wiggins)

Leaves also make good choices to keep cardboard from blowing away. (Photo by Charlotte Ekker Wiggins)

If I can time the cardboard addition to weather, even better. A good rain will help settle the cardboard into the hillside and help it smother what is underneath.

If something is strong enough to grow through cardboard, I tend to leave it.

It can take 6 weeks to 3 months to kill off what was originally growing in an area now covered in cardboard.

Once the area is cleared and is covered in shredded leaves and wood chips, it should be ready for planting in the next growing season.

Now I’m working on cardboard for the next flower garden. (Photo by Charlotte Ekker Wiggins)

Now I’m working on cardboard for the next flower garden. (Photo by Charlotte Ekker Wiggins)

I like the idea of repurposing cardboard in my garden. The cardboard also provides a nice layer that helps maintain moisture in the soil.

Coming up next, planting native tree seedlings from George O. White Nursery, coming in around April.

Charlotte

Winter Watering Holes

My favorite winter watering hole for my birds, a tiny waterfall. (Photo by Charlotte Ekker Wiggins)

My favorite winter watering hole for my birds, a tiny waterfall. (Photo by Charlotte Ekker Wiggins)

Winter Watering Holes

We think of garden visitors like butterflies and birds enjoying bird baths in the summer but they also need a good source of water in the winter when it’s not so easy. After several options, I finally found the easiest, and most reliable way to offer water to my birds and bees over winter: a small waterfall. The continuously moving water provides a constant water source when other options are either frozen or no longer available.

For many years, I would try pouring hot water into concrete bird baths to break up the ice. Depending on the outside temperatures, the water would just freeze.

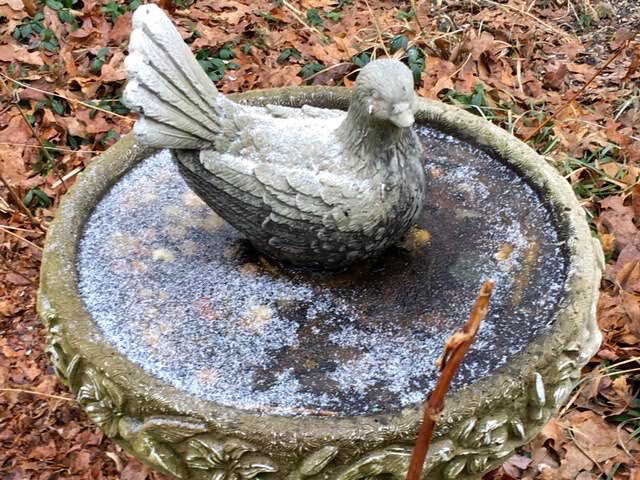
One of the bird baths near a bird feeder covered in ice. (Photo by Charlotte Ekker Wiggins)

One of the bird baths near a bird feeder covered in ice. (Photo by Charlotte Ekker Wiggins)

I do have a heated bird bath. The challenge with this option is having a deck or pole where it can be installed, as well as nearby electricity.

I had this plugged in and on my porch for several days. It needs to be daily checked and kept filled, not to mention finding a good way to mount it.

Heated birdbaths need a safe mounting pole and nearby electricity. (Photo by Charlotte Ekker Wiggins)

Heated birdbaths need a safe mounting pole and nearby electricity. (Photo by Charlotte Ekker Wiggins)

When I found this portable water fall on sale, I was not thinking about this being a watering hole for birds and other creatures. I installed it next to my front porch and added local rocks to help it blend into the nearby limestone.

I was thinking this would attract frogs I could enjoy watching. Instead, birds, bees and butterflies have made this a favorite watering spot all year around.

This waterfall is an easy way to provide water in winter. (Photo by Charlotte Ekker Wiggins)

This waterfall is an easy way to provide water in winter. (Photo by Charlotte Ekker Wiggins)

What I like about a portable water fall for winter water is that the constant movement keeps the water from freezing. The water fall holds the water that gets circulated and is easily refilled periodically.

if you want to manage the water fall, you can place it on a timer so that it doesn’t run all of the time. Mine shuts off in the evening during summer and kicks back on early morning. During winter, I keep it running all night so that the water doesn’t freeze.

Bluebirds making a winter stop at my porch water fall for a drink. (Photo by Charlotte Ekker Wiggins)

Bluebirds making a winter stop at my porch water fall for a drink. (Photo by Charlotte Ekker Wiggins)

The morning I looked out my front door to see a whole flock of Eastern Bluebirds getting a drink out of the water fall I knew this was the solution for me. And my birds.
For the ease of providing water all year, this has turned out to be the best option.

You will find these portable water falls at big box home and garden centers usually spring through summer. I have seen them on sale in the fall, usually when inventory is down to only one or two units.

Charlotte

How to Compost

Composting can be done is something as simple as a coffee can. (Photo by Charlotte Ekker Wiggins)

Composting can be done is something as simple as a coffee can. (Photo by Charlotte Ekker Wiggins)

How to Compost

All of that food, an estimated 40% of what we buy and don’t eat, can be put to very good use. It can feed the microbes, mushrooms, mycelium and plants that in turn, feed us. Yes, it’s a microbes eat mushrooms kind of world.

Now when I talk about composting in some of my lectures, some people wrinkle up their noses and tell me they don’t compost because it smells. And it’s messy. And it takes up a lot of space. And it’s complicated, and…

I’m here to tell you it doesn’t have to be any of those things. The principles are simple and, with a little change in your habits, you too can easily start to compost.

Composting areas do not have to be ugly, his charming birdhouse surrounds one of my composting stations. (Photo by Charlotte Ekker Wiggins)

Composting areas do not have to be ugly, his charming birdhouse surrounds one of my composting stations. (Photo by Charlotte Ekker Wiggins)

And, one more usual objection, composting does not need to be ugly, composters can easily be incorporated into a garden landscape. Do you see any composters?

Okay, ready?

Start Collecting Kitchen Scraps

Probably the smelly messy part of composting is the accumulation of kitchen scraps. This is how I started composting several decades ago, and there is no mess or smell.

Know that little pull out drawer at the bottom of your refrigerator freezer? Bet you didn’t know that was a composting bin, did you.

Start composting collecting kitchen scraps in a plastic bag stored in your freezer. (Photo by Charlotte Ekker Wiggins)

Start composting collecting kitchen scraps in a plastic bag stored in your freezer. (Photo by Charlotte Ekker Wiggins)

Get a sturdy bag; I used to use a plastic bag. Place it in the bottom rung of your freezer. Toss in kitchen scraps when you have some.

Once the bag is full of frozen kitchen scraps except for meat, take it outside and bury it in a hole in your garden. Shrubs, trees and any established plants will appreciate the extra dinner. Or two.

Repurposed coffee cans make good small composters inside and outside refrigerators. Make sure to mark them. (Photo by Charlotte Ekker Wiggins)

Repurposed coffee cans make good small composters inside and outside refrigerators. Make sure to mark them. (Photo by Charlotte Ekker Wiggins)

If you don’t like the plastic bag idea, use a repurposed plastic coffee can. The coffee cans work well because most have a handle on the side so you can easily carry it from one spot to the next.

We use this one in the photo at our local bee club meetings to collect coffee grounds, tea bags and other food scraps. Coffee filters and tea bags can be composted, as can most paper towels and paper napkins.

A composting bucket that has filters in the lid. This one sometimes is in the refrigerator, other times on my kitchen counter. (Photo by Charlotte Ekker Wiggins)

A composting bucket that has filters in the lid. This one sometimes is in the refrigerator, other times on my kitchen counter. (Photo by Charlotte Ekker Wiggins)

You can also buy composting buckets that include filters in the lid. I don’t use the filters because they are not needed when the bucket is in the refrigerator. These buckets are designed to sit on a kitchen counter for easy access. The filters keep any odors from escaping.

Composting Areas

Once you get into the habit of collecting kitchen scraps, you can graduate to building a spot outside where you dump it with dried grass clippings and leaves. Most people use a garden corner in the back.

You can make a barrel out of chicken wire; repurpose a plastic barrel by making holes in the bottom so it can drain, or buy a sealed composter like the ones i have.

To make access easier, I now have two composting stations, one on either side of my house, close to where my flower beds are located. Both have two composters each so that i can let one “cook” while I am filling up the other one.

Here is how one of my composting stations is set up:

Coffee cans on left collect rainwater; the yellow bucket is used to pick up leaves. The two composters are easy to rotate to add air. The barrel on the back also helps collect material for the composters, and I use it to remove compost to spread in …

Coffee cans on left collect rainwater; the yellow bucket is used to pick up leaves. The two composters are easy to rotate to add air. The barrel on the back also helps collect material for the composters, and I use it to remove compost to spread in gardens. (Photo by Charlotte Ekker Wiggins)

There are many composters currently on the market. I prefer sealed ones because they keep uninvited visitors from rummaging through the food scraps and making a mess. Not many garden centers where i live carry them so check online.

Here is the back of my birdhouse composting station:

Repurposed coffee can, left, collects rain water. I fill up one composter, then allow it to work its magic while I work on the second one. Autumn clematis covers the birdhouse mid-summer. Don’t ask me about the red garden hose, guess it’s getting st…

Repurposed coffee can, left, collects rain water. I fill up one composter, then allow it to work its magic while I work on the second one. Autumn clematis covers the birdhouse mid-summer. Don’t ask me about the red garden hose, guess it’s getting stored there for winter. (Photo by Charlotte Ekker Wiggins)

My first composter, the black one on the right, is now more than 40 years old and is still working well. These barrel composters also collect liquid that can be removed through a capped opening at the bottom. The challenge with these is that, once full, they can be hard to turn. For me.

This is my newest composter, with two separate chambers so I can fill one up and let it decompose while I work on the second one.

I like the composters with side handles, they are easier to turn when full.

Don’t stick your nose inside, of course it’s going to smell, the stuff is decomposing! (Photo by Charlotte Ekker Wiggins)

Don’t stick your nose inside, of course it’s going to smell, the stuff is decomposing! (Photo by Charlotte Ekker Wiggins)

What to Compost

In general, you need half green and half brown with a dose of water to keep the microbes working.

Green are the things that come out of your kitchen:

Kitchen scraps

Coffee grounds and tea bags (coffee filters and tea bags, too)

Fresh leaves, plant trimmings, whatever green you pull out of your garden and don’t want growing

Grass clippings

Manure

Brown are the things that are already dead and decomposing:

Dead leaves and weeds

Egg shells

Wood ash from your fireplace

Wood chips

Sawdust

Straw

You can compost all year. It will take longer for these items to interact and break down so you will more quickly make compost in summer than you do in winter.

How do you know when it’s done?

It will be a black and crumbly and look very much like soil you buy at a home and garden center.

Almost finished compost, this is still a bit wet and still has some pieces to decompose but there is no smell. Almost ready to add to my flower beds! (Photo by Charlotte Ekker Wiggins)

Almost finished compost, this is still a bit wet and still has some pieces to decompose but there is no smell. Almost ready to add to my flower beds! (Photo by Charlotte Ekker Wiggins)

To use, spread lightly over existing flower beds, around trees and shrubs. I try to time it before a rain so that the water helps the compost filter down into the soil and roots.

Once you start seeing the difference compost makes in your garden I will bet you will be hooked. It is such an easy thing to do and has huge implications. Soil is what keeps our plants and food sources healthy and growing so why not invest a little time to give back?

Charlotte

Cracked Corn De-Icer

Cracked corn nicely melts ice without damaging nearby soil. (Photo by Charlotte Ekker Wiggins)

Cracked corn nicely melts ice without damaging nearby soil. (Photo by Charlotte Ekker Wiggins)

Cracked Corn for Ice

There’s an often-repeated joke when the forecast in Missouri calls for snow. Get thee to the grocery store for bread and milk, a reference to how some areas of the state get cleared out of the basics as part of their winter storm preparations.

Now I can remember the days when we had winter storms that closed down schools and whole parts of the state for days. And one winter, we were ice-covered for 6 weeks with Meals on Wheels drivers delivering food wearing golf shoes.

I confess, when the forecast calls for ice, I make the prerequisite grocery store stop and then head out to our local farmer’s exchange for a supply of cracked corn. Cracked corn makes a great de-icer, something I need living on a hillside where my driveway not only dips but curves. I would prefer not to have my car ending up sliding down the hill, which it has attempted a couple of times.

My garden paths also can be dangerous covered in ice. Since I keep bird feeders full during storms, its helpful to be able to safely access them.

Cracked corn quickly melts ice along paths, sidewalks and driveways. (Photo by Charlotte Ekker Wiggins)

Cracked corn quickly melts ice along paths, sidewalks and driveways. (Photo by Charlotte Ekker Wiggins)

To use, spread the cracked corn over the area you want to clear of ice. The corn generates heat and melts into the ice, not only breaking up the ice but providing a safer surface for walking. It will quickly disappear with the help of birds and, in my case, wild turkeys that will come along and snack.

Usually ice is removed with harmful salt, which can damage soil around established plantings including trees and shrubs. I do gently remove the leftover salt that accumulates at the top of my driveway and property line to minimize rain carrying the salt down the hill into flower beds.

Cracked corn comes in bags of 25 lbs and 50 lbs. Carrying the bags in the back of your car will also provide some weight to more safely navigate ice-covered roads.

If you have the choice, stay home during and immediately after ice storms; no one should take the risk of getting hurt if they can help it. And grab a cup of coffee or tea as you sit at a window. Ice storms are good times to slow down and enjoy the birds at your bird feeders!

Charlotte


New Pussy Willow Starts

More new leaves on my pussy willow starts. (Photo by Charlotte Ekker Wiggins)

More new leaves on my pussy willow starts. (Photo by Charlotte Ekker Wiggins)

New Pussy Willow Starts

It’s about three months since I picked up these pussy willow branches. After enjoying them in water for several weeks, I moved them to pots of potting soil hoping they would root.

When I think of pussy willows, I remember the vintage cat postcards my grandmother used to send me. I was not prepared for what happened during their transition. The grey catkins bloomed into magnolia-like burgundy flowers, an unexpected but delightful step. It was fun going to visit them every morning to see what was blooming.

Now those pussy willow stems are starting to show signs of new growth.

Pussy willow flowers make way for new leaves. (Photo by Charlotte Ekker Wiggins)

Pussy willow flowers make way for new leaves. (Photo by Charlotte Ekker Wiggins)
A friend told me pussy willows were easy to get rooted and he was right, at least so far.

I prefer to keep the stems in soil to root. It cuts down one transitional step if they had been rooted in water.

Having them in soil also will make the transition to the outside easier.

So how do you know if your cuttings are starting to root?

A tiny leaf sprouting from the tip of the pussy willow branches. (Photo by Charlotte Ekker Wiggins)

A tiny leaf sprouting from the tip of the pussy willow branches. (Photo by Charlotte Ekker Wiggins)

You are looking for new growth. On these pussy willow branches, it was this tiny leaf that told me growth was continuing including developing roots at the other end.

Willows are excellent bee food plants so I’m hoping I can get these started and into the ground this spring to keep my honey bees company.

Charlotte
Mo. Conservation Permit Card

Missouri Conservation Permit Card provides 15% discount up to $20 on native plant orders. (Photo by Charlotte Ekker Wiggins)
Missouri Conservation Permit Card provides 15% discount up to $20 on native plant orders. (Photo by Charlotte Ekker Wiggins)

Mo. Conservation Permit Card

Do you have your Missouri Conservation Permit Card? It used to be called a Heritage Card. It still costs only $2 and is perpetual so you don’t need to renew.

And why would you want to have this card?

If you are looking for Missouri native plants, trees and shrubs and buy from George O. White Nursery, the card entitles you to 15% off up to $20. That more than pays back the original $2 price of the Permit Card just for plant purchases.

The card also provides discounts for Mo. Department of Conservation books, calendars and hunting and fishing permits.

Charlotte

January Gardening Tips

Iris are already growing tall in my January garden. (Photo by Charlotte Ekker Wiggins)

Iris are already growing tall in my January garden. (Photo by Charlotte Ekker Wiggins)

January Gardening Tips

January used to be the month when a gardener could sit back and do some of the most important work: planning. We’ve had record high temperatures in USDA Hardiness Zone 5B, turning growing conditions into early spring rather than winter.

According to US Department of Agriculture, the Hardiness Zones are based on the average annual minimum winter temperature divided into 10-degree F zones, which give a range of temperatures for a certain plant or tree. The hardiness zones for the Midwest fluctuate more than other zones but average Zones 4,5 and 6. The zones for Missouri can be found here: https://planthardiness.ars.usda.gov/PHZMWeb/

These zones are averaged over 13 years and adjusted accordingly. There may be major adjustments in a couple of years due to climate emergency. Predictions for the Midwest have included longer springs and falls, shorter winters and summers; and higher summer temperatures. These changes are occurring very fast, challenging nature to adjust.

The following are suggested January gardening tips and chores:

1.         Review your garden diary from last year. Underline items you want to get done this year. I also carry over the ones I didn’t get to last year, or drop them off the master list. This is a good time to dream.

2.         Identify what plants you want to add this year and note what soil and sun requirements they will need. Focus on adding native plants. Once established, native plants will be low care and excel in local soil and weather conditions.

3.         Plan on expanding flowerbeds to start removing grass from your property. Expanding flowerbeds will give you areas to plant vegetables as well as flowers and provide more food for pollinators. One way to start expanding flowerbeds is to place cardboard along the existing flowerbed edge and then move the flower bed border early spring. Mulch on the cardboard will keep the garden looking nice and help restore healthy soil conditions.

 4.        Order catalogs you have used in the past and share catalogs you don’t need or use. One of my favorites is the Missouri Wildflowers Nursery Native Plants catalog, it has lovely pictures with a quick guide on what growing conditions native plants require and they offer great plant starts. www.mowildflowers.net

5.         Order locally-adapted seed catalogs. Baker Creek Heirloom Seeds is a favorite seed catalog from Mansfield, Missouri. www.rareseeds.com.

6. January is a good time to sort through seed packets. (Photo by Charlotte Ekker Wiggins)

6. January is a good time to sort through seed packets. (Photo by Charlotte Ekker Wiggins)

7.         Read. Whether it’s 2 Million Blossoms, a new quarterly focused on pollinators, to new gardening books, catch up on what you couldn’t get to last year.

8.         Remove broken limbs in pathways to keep walkways clear and safe.

9.         On warm days, pile mulch and leaves on garden beds if they’ve been blown off by winter winds. Mulch will help keep the soil temperature even and reduce the thawing and heaving that causes plant damage.

10.       Check inside plants for any hitchhiking bugs and remove. Make sure they are getting their sunlight needs met. If not, move them. Water with diluted fertilizer. Prune as necessary, I use metal sewing thread snips. The thread snips make it easy to trim plants and keep them bushy.

11. Time to remodel bird houses for a new nesting season. (Photo by Charlotte Ekker Wiggins)

11. Time to remodel bird houses for a new nesting season. (Photo by Charlotte Ekker Wiggins)

12.       Drop your garden pruners and other garden tools to get sharpened. Home and garden centers with service departments can usually sharpen tools.

13.  Start scouting where you can install rain barrels and totes to collect rain water off your gutter system. Observe what happens to rain and photograph so you can refer to the rain pattern later.

14. Water newly-planted chrysanthemums so they can get their roots established.

Charlotte

Repurpose Christmas Trees

Christmas trees are excellent winter bird and small animal sanctuaries. (Photo by Charlotte Ekker Wiggins)

Christmas trees are excellent winter bird and small animal sanctuaries. (Photo by Charlotte Ekker Wiggins)

Repurpose Christmas Trees

When I used to write a weekly column carried in several Missouri newspapers, one of the readers took my repurposing Christmas tree advice but complained her artificial tree wasn’t decomposing. Let me make it clear here, when I am talking about repurposing Christmas trees, this is about those live trees that have been cut and those in pots that aren’t making it.

Although it’s a nice idea to think you can buy a potted live Christmas tree, many don’t make it through the move inside and then back outside. You can also repurpose those trees once you move them outside.

How to Repurpose Christmas Trees

Once all ornaments and lights have been removed, there are many things you can do with the Christmas tree in your garden:

  1. Place tree in a garden corner for a sanctuary for birds. Birds will use the branches for cover during windy, snowy days.

  2. Cut up the tree and use the branches to protect rose bushes.

  3. You can also use the cut up branches as mulch at the back of flower beds.

  4. Those cut up tree branches can also be formed into a door wreath.

  5. If you like the smell of the evergreens, pull off a handful and place in a bowl of water; they will last another couple of weeks if you refresh the water.

  6. If you have a compost pile, add the tree to the pile. It will biodegrade by spring.

  7. The branches can also be used as natural stakes. I collect cedar boughs to cover cattle panel arbors and to make teepee plant supports.

  8. If you have a pond, place the tree at the edge for a safe spot for birds to land to drink.

  9. If your pond is deep enough, Christmas trees make nice cover for baby fish later in spring.

  10. If you have cows and goats, give them small amounts of the untreated, unadorned tree branches to eat. They have natural Vitamin C and they also work as a natural de-wormer.

Recycling a Christmas Tree

Many communities offer a drop off spot where you can take a Christmas tree. In our mid-Missouri community, our recycling center accepts trees that will get ground up in a wood chipper into mulch.

Dried branches and hunks of trunk will make fabulous firewood for an outdoor fire pit or bonfire, but be sure to keep the fire outside. When Christmas trees burn, they release creosote, a highly flammable, toxic substance consisting mainly of tar -- into the fire smoke. Creosote may build up on the inside of your chimney, increasing your risk of a chimney fire.

If you are a beekeeper, Christmas trees can also be used as handy windbreaks in front of bee hives.

Christmas trees can also be used as bee hive windbreaks. (Photo by Charlotte Ekker Wiggins)

Christmas trees can also be used as bee hive windbreaks. (Photo by Charlotte Ekker Wiggins)

Check with your local home and garden centers. Some will give their extra Christmas trees away after the holidays.

Charlotte

Dried Hydrangea Wreaths

Updating my bee shed grapevine wreath with dry hydrangeas. (Photo by Charlotte Ekker Wiggins)

Updating my bee shed grapevine wreath with dry hydrangeas. (Photo by Charlotte Ekker Wiggins)

Dried Hydrangea Wreaths

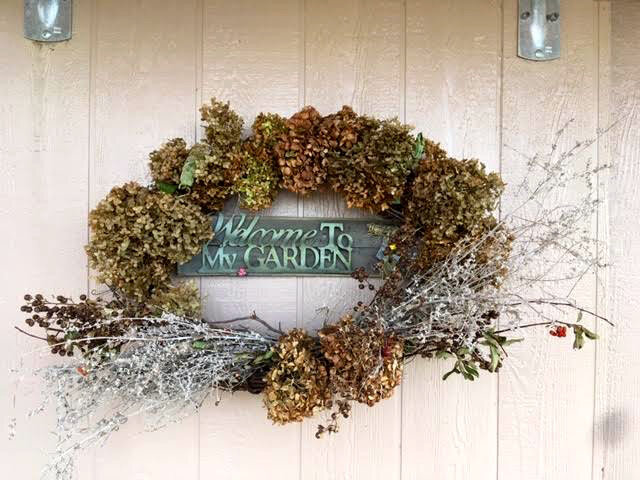
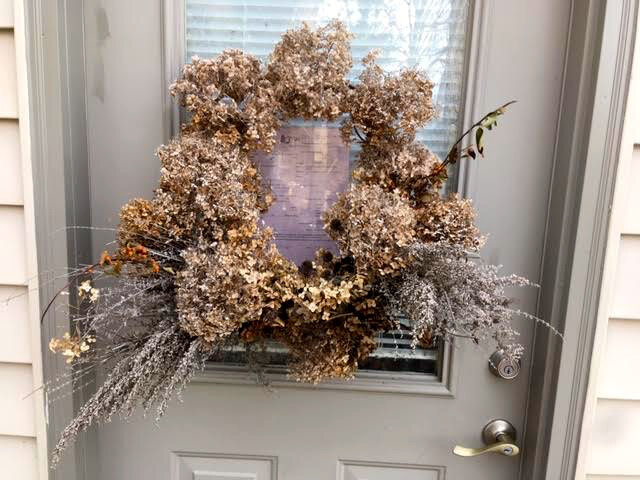
If you like to have wreaths on outside doors, dried hydrangeas are a wonderful addition to fill out the traditional grapevine wreaths. Dried hydrangeas add not only volume but color to the wreaths, depending on how the hydrangeas have been dried.

Look around your neighborhood and see who has hydrangeas, then ask them if you can have the flower heads when they are cut off. Some are cut in the fall, others in early spring.

Here is my bee shed grapevine wreath before I added the dried hydrangeas circling the wreath. I had a few hydrangeas in the center bordered by sprigs of dried Russian sage and orange berries. They didn’t last long, someone came along and removed all of the orange berries sprigs. It was pretty while it lasted!

Other dried flowers updated my grapevine wreath earlier this fall. (Photo by Charlotte Ekker Wiggins)

Other dried flowers updated my grapevine wreath earlier this fall. (Photo by Charlotte Ekker Wiggins)

One of the many advantages of using dried hydrangeas in outside wreaths is that they are not attractive as deer food.

Not that deer are the only ones who clear out some of my wreaths but they tend to leave tell tale hoof marks on the ground.

Here is the grapevine wreath as I was finishing adding the dried hydrangeas:

Filling in my bee shed grapevine wreath with dried hydrangea flowers. (Photo by Charlotte Ekker Wiggins)

Filling in my bee shed grapevine wreath with dried hydrangea flowers. (Photo by Charlotte Ekker Wiggins)

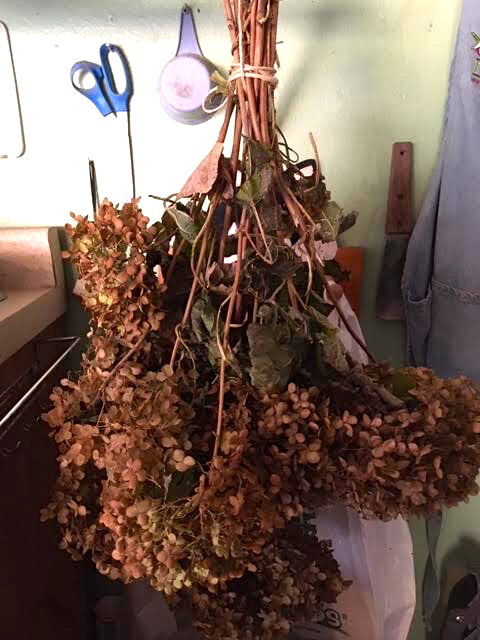
Let’s say you have hydrangea plants and want to dry them before adding to a wreath.

I do it simply by tying them with twine and drying them in my garage hanging upside down so the flower heads dry straight on the stems.

It can take a few days to a few weeks to dry, depending on how humid conditions are.

Dry hydrangeas hanging down so the flower heads stay straight. (Photo by Charlotte Ekker Wiggins)

Dry hydrangeas hanging down so the flower heads stay straight. (Photo by Charlotte Ekker Wiggins)

Now here are a few more grapevine wreaths easily transformed by adding dried hydrangea flowers. starting with a small door wreath.

Simple dried hydrangea flowers completely change this grapevine wreath. (Photo by Charlotte Ekker Wiggins)

Simple dried hydrangea flowers completely change this grapevine wreath. (Photo by Charlotte Ekker Wiggins)

The welcome wreath on my deck was renewed with these dried hydrangea flowers that fill in where wildlife have helped themselves to the other dried flowers:

Large grapevine wreath with dried hydrangeas against stone. (Photo by Charlotte Ekker Wiggins)

Large grapevine wreath with dried hydrangeas against stone. (Photo by Charlotte Ekker Wiggins)

And these stunning rust-colored dried hydrangea flower heads have quickly transformed the front porch grapevine wreath.

There’s a little bluebird gourd birdhouse in the center now almost lost in all of the dried flowers I’ve added.

These yellow dried hydrangeas add color to this outdoor grapevine wreath. (Photo by Charlotte Ekker Wiggins)

These yellow dried hydrangeas add color to this outdoor grapevine wreath. (Photo by Charlotte Ekker Wiggins)

The biggest challenge is making sure the dried hydrangea stems are solidly woven through the grapevine wreaths so they hold up to wind.

Several months ago I watched as a rabbit dragged off a piece of dried flowers from this wreath. I didn’t get a close look to what it was but I do know sometimes I add enticing edibles. Not a problem, just gives me another opportunity to update the wreaths with what is growing in my garden.

Charlotte

Snow Gauge

My garden rain gauge full of snow. (Photo by Charlotte Ekker Wiggins)

My garden rain gauge full of snow. (Photo by Charlotte Ekker Wiggins)

Snow Gauge

Of all of the things I use daily in my garden, my large numbered rain gauge is in the top 10 list. Easy to see from my living room window, it helps me to gauge how well my garden is hydrated. Soil is 25% water so its helpful to tract that my mid-Missouri soil is getting at least one inch of rain a week.

When I spotted my “rain” gauge after our last snowfall, I realized it had now turned into a snow gauge. But how does that measure of snow translate to garden rain?

According to the National Oceanic and Atmospheric Administration, “on average, thirteen inches of snow equals one inch of rain in the US, although this ratio can vary from two inches for sleet to nearly fifty inches for very dry, powdery snow under certain conditions.”

And then there is the impact of temperature.

To calculate rain to snow for temperatures between 20 and 27 degrees Fahrenheit, multiply rainfall by 15 instead of 10.

For temperatures between 15 and 19 degrees Fahrenheit, multiply rainfall by 20.

Between 10 and 14, multiply by 30; between 0 and 9, multiply by 40; between -20 and -1, multiply by 50, and between -40 and -21, multiply by 100.

For example, to calculate the snowfall equivalent of 3 inches of rain at 5 degrees Fahrenheit, multiply 3 by 40 to obtain 120 inches of snow. Therefore, if 3 inches of rain are expected but the temperature drops suddenly to 5 degrees Fahrenheit, 120 inches of snow will fall.

My rain gauge with actual rain. To think this could have been several inches of snow! (Photo by Charlotte Ekker Wiggins)

My rain gauge with actual rain. To think this could have been several inches of snow! (Photo by Charlotte Ekker Wiggins)

In Missouri, on the average more snow falls in the northern part of the state compared to the rest of the state. An average of 18-24 inches falls in northern Missouri a year compared to 8-12 inches in the southernmost part of the state.

This last snow had large snowflakes, without ice or sleet. I don’t remember the temperature but I think it was above 27F. So not much moisture added to the soil but pretty nevertheless.

Charlotte


Bah Humbugs!

Aphids on one of my tropical hibiscus wintering over inside. (Photo by Charlotte Ekker Wiggins)

Aphids on one of my tropical hibiscus wintering over inside. (Photo by Charlotte Ekker Wiggins)

Bah Humbugs!

It’s a beautiful sunny day in the 60s in mid-Missouri, a strange warm day considering Christmas is only a couple of days away. With windows open, it was also a perfect day to check my inside plants to find the unwelcome hitchhikers on some of my tropical plants.

Even though I clean them off before bringing inside, it only takes one little group of aphids, mealybugs and scale insects to take hold and start to spread in a closed up home environment.

Scale looks like brown or black ovals along the stem of a plant. They start out as clear or beige disks that get darker as their skeleton hardens.

Black or brown scale sapping a poinsettia stem.  (Photo by Charlotte Ekker Wiggins)

Black or brown scale sapping a poinsettia stem. (Photo by Charlotte Ekker Wiggins)

You can see the beginning of scale under the black one on the poinsettia stem. I tend to remove them by hand with a q-tip dipped in alcohol.

The aphids look like small white dots.

The mealy bugs look like fluffy white cotton ovals and are often found at the base of a plant and under leaves.

These are mealy bugs on one of my moth orchids. (Photo by Charlotte Ekker Wiggins)

These are mealy bugs on one of my moth orchids. (Photo by Charlotte Ekker Wiggins)

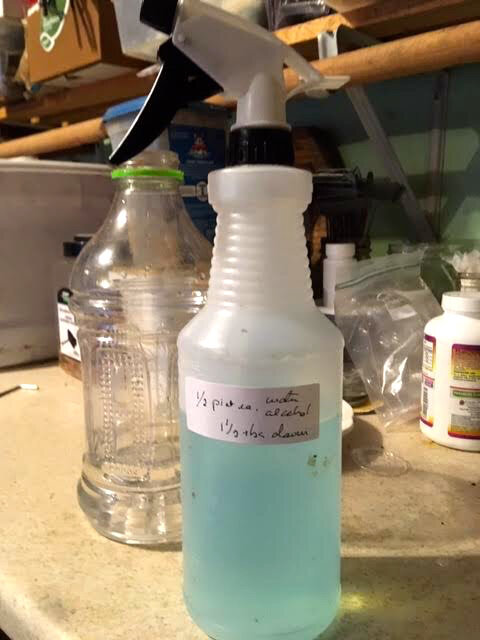
Luckily there is a simple solution and one we can all make at home:

My homemade bug spray recipe in a spray bottle. (Photo by Charlotte Ekker Wiggins)

My homemade bug spray recipe in a spray bottle. (Photo by Charlotte Ekker Wiggins)

Homemade Bug Spray Recipe

1/4 cup water

1/4 cup 70% alcohol

1 tablespoon Dawn liquid detergent

Shake well in a spray bottle. Apply to the bugs on the plants.

All set to take out those unwelcome bugs! (Photo by Charlotte Ekker Wiggins)

All set to take out those unwelcome bugs! (Photo by Charlotte Ekker Wiggins)

Check and spray the back of leaves as well. (Photo by Charlotte Ekker Wiggins)

Check and spray the back of leaves as well. (Photo by Charlotte Ekker Wiggins)

If these plants were outside, the bugs would become food for something else. Ladybugs love aphids and will consume scale insects as well. I don’t have any in my house overwintering and ah, don’t plan to invite any although. Yes, it did cross my mind.

What i like about this homemade spray is that it naturally cleans the bugs off the plants as well as eliminates them.

When the plants return outside, the first spring rain helps give them a good start without these bugs having sapped their strength through winter.

Charlotte

Inside Plants Healthy

Reading a book under this fig tree reminds me of being outside. (Photo by Charlotte Ekker Wiggins)

Reading a book under this fig tree reminds me of being outside. (Photo by Charlotte Ekker Wiggins)

Inside Plants Healthy

There is a new scientific study supporting what I have known for decades; having plants inside over winter make us happy. And healthier.

It’s easy to determine why. The plants are a bit of green in an otherwise cold and dreary winter tableau. For me, having the signs of life are frankly up lifting. Caring for the greenery is also therapeutic, keeping me busy until I can get outside again.

As we head into winter, there are other good reasons to have plants inside.

Better Air

During photosynthesis, plants absorb carbon dioxide and release oxygen. We as people inhale oxygen and exhale carbon dioxide, making us mutually dependent. At night, photosynthesis ceases, and plants typically respire like humans, absorbing oxygen and releasing carbon dioxide.

More Humid Air

As part of the photosynthetic and respiratory processes, plants release moisture vapor, which increases humidity of the air around them. Plants release roughly 97% of the water they take in.

Place several plants together, and you can increase the humidity of a room, which helps keeps respiratory distresses at bay. Studies at the Agricultural University of Norway document that using plants in interior spaces decreases the incidence of dry skin, colds, sore throats and dry coughs.

Purified Air

Plants remove toxins from air –up to 87% of volatile organic compounds (VOCs) every 24 hours, according to NASA research. VOCs include substances like formaldehyde (present in rugs, vinyl, cigarette smoke and grocery bags), benzene and trichloroethylene (both found in man-made fibers, inks, solvents and paint). Benzene is commonly found in high concentrations in study settings, where books and printed papers abound.

The NASA research discovered that plants purify that trapped air by pulling contaminants into soil, where root zone microorganisms convert VOCs into food for the plant.

Potted sage in one of my living room windows. (Photo by Charlotte Ekker Wiggins)

Potted sage in one of my living room windows. (Photo by Charlotte Ekker Wiggins)

Edible Plants

I can’t imagine making my winter soups without access to fresh herbs growing inside. I have a rosemary plant that is now on its 5th year wintering over inside while giving me fresh flavor in cooking. Another small pot of sage is handy for cooking with fish.

Improving Health

Adding plants to hospital rooms speeds recovery rates of surgical patients, according to researchers at Kansas State University. Compared to patients in rooms without plants, patients in rooms with plants request less pain medication, have lower heart rates and blood pressure, experience less fatigue and anxiety, and are released from the hospital sooner.

The Dutch Product Board for Horticulture commissioned a workplace study that discovered that adding plants to office settings decreases fatigue, colds, headaches, coughs, sore throats and flu-like symptoms. In another study by the AgriculturalUniversity of Norway, sickness rates fell by more than 60 percent in offices with plants.

Sharpening Focus

A study at The Royal College of Agriculture in England found that students demonstrate 70% greater attentiveness when they're taught in rooms containing plants. In the same study, attendance was also higher for lectures given in classrooms with plants.

Potted rosemary keeping me company in another window. (Photo by Charlotte Ekker Wiggins)

Potted rosemary keeping me company in another window. (Photo by Charlotte Ekker Wiggins)

How Many Plants?

The recommendations vary based on your goals:


To improve health and reduce fatigue and stress, place one large plant (8-inch diameter pot or larger) every 129 square feet.

In office or classroom settings, position plants so each person has greenery in view.

To purify air, use 15-18 plants in 6-8-inch diameter pots for an 1,800-square-foot house. That's roughly one larger plant every 100 square feet. Achieve similar results with two smaller plants (4-5-inch pots).

Based on these recommendations, my house should be a haven of happiness. And it is!

Charlotte

Follow the Foot Prints!

My snow-covered garden ready to “tell” on its visitors. (Photo by Charlotte Ekker Wiggins)

My snow-covered garden ready to “tell” on its visitors. (Photo by Charlotte Ekker Wiggins)

Follow the Foot Prints!

There are many reasons to look forward to cold, snow-covered days. They are great excuses to “rest” after a busy gardening and beekeeping season; it’s a good time to catch up with reading and I enjoy a cup of tea curled up in front of a fireplace with a purring cat in my lap.

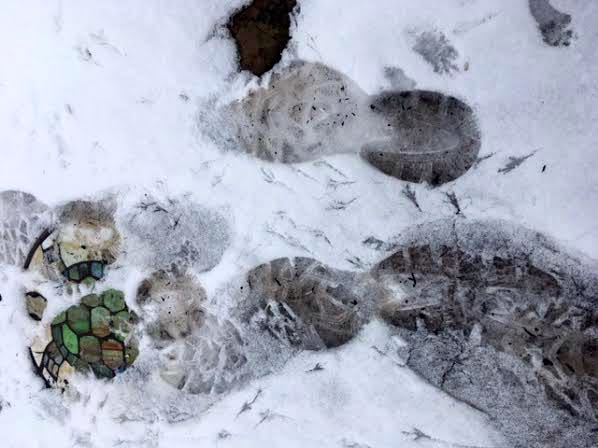
There’s one other reason and one that is part solving a mystery with a dash of fresh discovery. That is walking through my snow-covered garden and spotting the different foot prints in the snow, which confirms my regular visitors.

These look like squirrel prints along with some birds on the right. (Photo by Charlotte Ekker Wiggins)

These look like squirrel prints along with some birds on the right. (Photo by Charlotte Ekker Wiggins)

Although I can’t tell the difference between the different winter birds, those foot prints are the easiest and most fun to follow.

In the following photo, can you find the deer print?

The bird prints are easy to spot, even on rocky ledges. (Photo by Charlotte Ekker Wiggins)

The bird prints are easy to spot, even on rocky ledges. (Photo by Charlotte Ekker Wiggins)

As much as the individual foot prints are fun to follow, I like to find the intersection of prints and try to imagine what happened at that point.

When I watch my garden from inside my house, I sometimes spot birds running into each other and squirrels chasing each other through the garden, even in snow. Their combined foot prints, however, don’t mean they were in the one spot at the same time.

Let’s see, I see squirrels, birds, rabbits and maybe raccoon prints in this spot.

Now this looks like a traffic intersection, how many different prints do you see? (Photo by Charlotte Ekker Wiggins)

Now this looks like a traffic intersection, how many different prints do you see? (Photo by Charlotte Ekker Wiggins)

If they were all in the same spot at the same time, however, I imagine it would look something like this:

One more conflagration of foot prints, so easy to see in the snow. (Photo by Charlotte Ekker Wiggins)

One more conflagration of foot prints, so easy to see in the snow. (Photo by Charlotte Ekker Wiggins)

By checking the foot prints, I have also found some interesting trails. I didn’t know some of my birds like to winter over some of my hydrangea bushes, or how much many of these creatures circle my small front pond. Seeing those foot prints inspired me to make more of an effort to give them water in nearby bird baths.

Being outside after a snowfall is also quite quiet and beautiful, completely changing the look of my garden covered in a blanket of snow.

And one more set of prints that mar the white landscape. (Photo by Charlotte Ekker Wiggins)

And one more set of prints that mar the white landscape. (Photo by Charlotte Ekker Wiggins)

If you haven’t had a chance to walk through your garden after a snow storm, do it safely if you can but give it a try. You may be surprised at what evidence you see of what is visiting your garden!

Charlotte

March Gardening Chores

Spring is all about daffodils in my hillside garden. (Photo by Charlotte Ekker Wiggins)

Spring is all about daffodils in my hillside garden. (Photo by Charlotte Ekker Wiggins)

March Gardening Chores

March is the beginning of daffodil days in my garden, a wonderful almost daily parade of new flowers that can distract me from getting things done but doesn’t stop me from garden dreaming. The weather can also be a little challenging in USDA Hardiness zone 5b so March is a hit and miss month in terms of getting a lot done but I still have” must do” chores.

Under the category of garden maintenance:

1.     Prune and fertilize roses. On the first warm day, I remove all dead branches so the new growth will have room and add coffee grounds, banana peels, Epsom salts and crushed egg shells mixed into the soil around the base of the plants. Gently, you don’t want to tear up the roots. Also a good time to mulch.

2.     Plant onion sets around roses to keep bugs at bay. Three for miniature roses, 5-6 for the larger roses.

3.     Prune fruit trees. Nothing elaborate, I make sure the branches don’t cross and are open in the center. Also mulch. Make a tire around the base leaving the space up at the tree trunk open.

My yellow Lenten Roses herald the arrival of yellow in my garden. (Photo by Charlotte Ekker Wiggins)

My yellow Lenten Roses herald the arrival of yellow in my garden. (Photo by Charlotte Ekker Wiggins)

4.     My hellebores and ‘Autumn Joy’ Sedum get the old greenery cut off so any new growth gets to shine. The Sedum starts look like tiny green roses.

5.     If I haven’t already painted and repaired birdhouses and native bee houses, those get finished and installed this month. If I put this off much longer, possible renters, especially birds tend to pop into the garage to check out the real estate before it’s moved out into the garden.

6.     Mulch. My over-wintering mulch pile is ready to spread over new areas that need cover for the season and areas that lost cover over winter. Good time to load up the wheelbarrow and keep a supply at hand.

In the category of planting:

7.     If you didn’t get your lettuce and spinach out in February, get them planted this month. I started a crop in my pot garden mid-February.

8.     March and St. Patrick’s Day is also the time to plant potatoes, radishes and carrots.

9.     The last frost day for this zone is Mother’s Day in May so it’s a little too early to get much else planted and much too early to move tropical plants outside, even if you are ready to toss them out on their aggravating dropping leaves by now. Give them a little rainwater and that will help tide them over another month or so.

10.  Also check inside plants for bugs. Look under leaves and if you see white bugs, clean off with a damp cloth wet with water and dishwashing liquid. Also spray soil with a few drops of dishwashing liquid in water in a spray bottle to get rid of eggs in soil. Start watering with ¼ strength fertilizer since days are getting longer. They are as anxious to get outside as you want them to be outside, I am sure, mine seem to blossom within a week of hitting my deck.

 Charlotte


Blooming Bulb Garden

One of my bulb gardens in bloom at a friend’s office. (Photo by Charlotte Ekker Wiggins)

One of my bulb gardens in bloom at a friend’s office. (Photo by Charlotte Ekker Wiggins)

Blooming Bulb Garden

Most years in fall, when spring bulbs are on sale, I pick up a few bags and make bulb gardens to share with friends mid-winter. Usually by early to mid-February those of us who live in Missouri are more than ready for spring and a little bulb garden offers the promise of more flowers to come.

This past year, I used crocus, small daffodils and tulips in my bulb garden, the bulbs layered so their roots could get nourishment as they grew. After watering and covering the bulbs with new potted soil, I wrapped them in a metallic wrap and placed them in a refrigerator to chill for 3 months.

Once the tips started to show, I started to pull them out and share as gifts for Valentine’s Day.

Usually the crocus bloom first, followed by the daffodils and tulips.

Here is how they look as they are getting started:

Bulbs after 12 weeks of cold getting ready to grow. (Photo by Charlotte Ekker Wiggins)

Bulbs after 12 weeks of cold getting ready to grow. (Photo by Charlotte Ekker Wiggins)

Once warmed up, it doens’t take the bulbs long to get growing. I place them in an area where they can get sun but not directly, and away from heat sources so that the heat doesn’t dry out their soil.

My bulb garden growing but not yet in bloom. (Photo by Charlotte Ekker Wiggins)

My bulb garden growing but not yet in bloom. (Photo by Charlotte Ekker Wiggins)

My crocus have bloomed in my pot, now waiting for the daffodils and tulips.

Daffodils bloom in my kitchen pot garden between potted begonias. (Photo by Charlotte Ekker Wiggins)

Daffodils bloom in my kitchen pot garden between potted begonias. (Photo by Charlotte Ekker Wiggins)


Another way to bring on an early spring is to add a floral quilt on your bed, like Pink Applique Tulips. These tulips last as long as you have the handmade quilt on your bed and no watering required!

Charlotte


Nap Time!

One of the squirrels in my garden enjoying winter sunshine. (Photo by Charlotte Ekker Wiggins)

One of the squirrels in my garden enjoying winter sunshine. (Photo by Charlotte Ekker Wiggins)

Nap Time!

Sometimes I feel like I’m living in an animal house, or at least in the middle of a zoo. Being a National Wildlife Federation certified wildlife garden, I do encourage wildlife to feel comfortable in my one acre limestone hillside garden.

There are small ponds for water. Bird feeders with a variety of treats and oak trees comfortable enough for homes.

One such tree is located outside my den. I can see it from the house and often start my morning looking at it out of my den windows. Over the years, hand-raised Robins have serenaded me from those tree branches. I have had an owl perched on one of the top branches and, most recently, watched a squirrel nesting.

The squirrel nest is nicely tucked between tree trunks. (Photo by Charlotte Ekker Wiggins)

The squirrel nest is nicely tucked between tree trunks. (Photo by Charlotte Ekker Wiggins)

Squirrel nests in Missouri are easy to see, especially in winter. With leaves off trees, the pile of nests are easy to spot. Most tend to be built towards the top of trees, at least in my garden.

My best guess is this is the largest of the 4 native Missouri squirrels. The fox squirrel, also known as the eastern fox squirrel or Bryant's fox squirrel, is the largest species of tree squirrel native to North America.

It has very sharp claws, a muscular body, and a long, fluffy tail. The most common fur color for a fox squirrel is reddish-brown, but color can vary greatly from overall pale gray to black with white feet. The fur on its belly is always lighter in color than the rest its body. Often a fox squirrel will have reddish hairs tipped with brown.

These animals are most often found in forests with open understory, or in urban neighborhoods with trees. They prefer to live among oak, hickory, walnut and pine trees, storing nuts for winter. They shelter in leaf nests or tree dens, but will sometimes make an attic their home if they find a way inside.

This particular morning we were enjoying a sunny day with temperatures a little warmer than usual.

As I peeked out of my den window, there was a squirrel, also enjoying the warm sunshine.

Shsssssss. (Photo by Charlotte Ekker Wiggins)

Shsssssss. (Photo by Charlotte Ekker Wiggins)

Grey squirrels are frequent visitors to my garden. This one has apparently decided my garden is a good place to nest. And rest!

Charlotte

New Online Tool Will Help MO Prioritize Plant Management

This is bush honeysuckle in winter, one of Missouri’s top 10 invasives. It kills everything that grows under it. (Photo by Charlotte Ekker Wiggins)

This is bush honeysuckle in winter, one of Missouri’s top 10 invasives. It kills everything that grows under it. (Photo by Charlotte Ekker Wiggins)

New Online Tool Will Help Missouri Prioritize Plant Management

Jefferson City, MO (February 8, 2019)—Yesterday, at the Missouri Natural Resources Conference in Osage Beach, MO, Dr. Quinn Long, a member of the Missouri Invasive Plant Task Force (MoIP), presented a statewide comprehensive invasive plant assessment during the workshop organized by MoIP, Invasive Species Collaboration: Informing the Masses, Building the Armies, Stemming the Flow, and Turning the Tide

"One of the biggest threats to Missouri's—and the nation's—native plants and animals, and to many facets of our economy, are invasive plants," said Carol Davit, MoIP Chair and Executive Director of the Missouri Prairie Foundation. "Invasive plants and animals—including that small percentage of non-native plants that, intentionally or accidentally, have been introduced here and have spread rapidly—are second only to outright habitat destruction in the loss of native biodiversity, can have negative impacts on our cattle, timber, and outdoor recreation industries, cause headaches for private landowners, and nationally, cost billions of dollars in control efforts annually." 


Dr. Quinn Long, botanist, Director of Shaw Nature Reserve, and MoIP member, worked since 2015 to lead the MoIP working group that assembled and analyzed invasive plant data for the assessment.

“This assessment—complete with maps for each of the 142 species assessed—will provide a valuable tool for landowners, land managers, and natural resource planners to focus their efforts on invasive plant management,” said Long.

The assessment maps depict abundance, impact, and rate of spread of these plants in the state. 

MoIP is a dedicated group of representatives from land-holding agencies and natural resource management professionals from across the state.

"We are pleased to present this important new tool, which is critical to assertive, prioritized invasive plant management efforts. Many individuals have worked very hard to make this assessment possible, including more than 25 reviewers; Phillip Hanberry, contractor with the Missouri Department of Conservation who generated the assessment maps; and Tina Casagrand, MoIP contractor who loaded and linked all maps to the MoIP website, where they are available for all to consult and use."

MoIP is housed and administered by Grow Native!, a native plant education and marketing program of the Missouri Prairie Foundation. The purpose of MoIP—working as a united, supportive front—is to review, discuss, and recommend actions related to managing known and potential non-­native invasive plant species that pose threats in Missouri and elsewhere in the lower Midwest.

For more information about MoIP, definitions of invasive plants, and many other resources, visit www.moinvasives.org.

So take the pledge and don’t plant, even better yet, remove the following:

These are Missouri’s top ten invasive plants that need to be removed. (Photo by Charlotte Ekker Wiggins)

These are Missouri’s top ten invasive plants that need to be removed. (Photo by Charlotte Ekker Wiggins)

I have been waging war against bush honeysuckle on my one acre hillside garden for years. Most of it has been removed; now I periodically check to make sure the plants on my neighbor’s property is now encroaching again.

Charlotte


February Gardening Chores

February is a good month to find seeds you want to plant later this year. (Photo by Charlotte Ekker Wiggins)

February is a good month to find seeds you want to plant later this year. (Photo by Charlotte Ekker Wiggins)

February Gardening Chores

We’re in the throes of another cold spell, wind chill below zero and everything around me frozen solid. Our big box stores, however, are offering onion sets, asparagus starts and Iho Peonies so spring is just around the corner.

I live in USDA Hardiness Zone 5b-6A so I tend to plant for plants that are hardier to the colder range. The following are my February gardening chores:

  • Pressure is on so if you haven’t made a dent in your reading pile, get a start, spring is only two months away. With our rapidly changing and more erratic climate patterns, the forecast is for an earlier spring. So also says the groundhog.

  •  If you haven’t ordered your favorite gardening catalogs, get them ordered. Look for catalogs with detailed plant descriptions and good photographs so you can use them for reference.  Missouri Wildflowers Catalog has lovely pictures, even old catalogs are still good references. www.mowildflowers.net. For heirloom seeds, try Baker Creek Heirloom Seeds at www.rareseeds.com, both are Missouri nurseries.

  • Now for a great Native Plant Guide, you can download the Prairie Moon Catalog online. This guide out of Winona, Minnesota offers North American Native seeds and plants along with a guide on how to get wildflower seeds to grow, how to plant bare root plants, seed combinations and a plant/insect interaction guide so you know what plants attract what pollinators. https://www.prairiemoon.com/catalog-request.html

  • Review last year’s garden diary entries. If you’ve missed a few entries, add them now. Underline items you wanted to get done this year. I make a list, then decide which projects I want to tackle. I also carry over the ones I didn’t get to last year, or drop them off the master list. This is a good time to dream.

  • Focus on adding native plants. Once established, they will be low care and tend to require less water than other plants and they will feed the native pollinators. They are connected.

  • Read. Whether it’s Missouri Gardener Magazine, which provides good local gardening information and gardening books, catch up on what you couldn’t get to last year. I keep a pile of gardening books from our local library’s semi-annual book sale just for snowy, cold winter days.

  • On warm days, remember to water mums planted this past year. New mums need a gallon a month to keep their roots moist their first year. Once established, mums will become perennials and deter bugs from around where they are planted.

  • Remove any broken limbs in pathways to keep walkways clear and safe.

  • Pile mulch and leaves on garden beds if they’ve been blown off by winter winds.

  • Check inside plants for any hitchhiking bugs and remove. Make sure they are getting their sunlight needs met. If not, move them. Water with diluted fertilizer. Prune as necessary.

  • Drop your garden pruners and other garden tools off to get sharpened, this is a slow time of year and this will give you a head start on the season.

  • When feeding birds, add a little sand in the bird feeder mix. Birds need sand to help them digest seeds. Also ensure they have an available water source. Feed suet on cold days.

  • If you have fish in an outside pond, make sure it has a hole in the ice so fish will get oxygen.

Charlotte

Pick the Right Pot

A typical bulb garden in a tapered pot. Is that the right pot to choose?

A typical bulb garden in a tapered pot. Is that the right pot to choose?

Pick the Right Pot

Bulb gardens are popular as gifts mid-winter. For years I have made bulb gardens from fall sale bulbs and tucked them into the back of my refrigerator 10-12 weeks for the bulbs to get the chiling they need before they start to grow.

Depending on when I made them, I start pulling them out mid-winter. Just as another winter storm is in the forecast, the green tips of little bulbs promise spring is not too far away.

Buds are starting to pop up in this homemade bulb garden. (Photo by Charlotte Ekker Wiggins)

Buds are starting to pop up in this homemade bulb garden. (Photo by Charlotte Ekker Wiggins)

When planning to plant anything, and here I am using the bulb gardens as an example, the size of the pot is important. You want at least 2 inches of new soil around the roots so the roots can take up nutrients and feed the plants. Especially when planting tulips, you also need a longer pot so the tulip greenery doesn’t fall over.

t’s easy to pack too many bulbs into the wrong-sized pot, which I did with one of the bulb gardens this year. See the white roots peeking out of the bottom?

Too many bulbs, not enough room in the pot. Time to move! (Photo by Charlotte Ekker Wiggins)

Too many bulbs, not enough room in the pot. Time to move! (Photo by Charlotte Ekker Wiggins)

I could tell from seeing those roots I was rusty in making my bulb gardens but luckily it was relatively simple to fix.

I selected another, larger pot I could use to transplant the original bulb garden. To make sure the bulbs were not impacted, I cut the original plastic pot off the roots after ensuring the bulb garden would nicely fit in the larger pot.

The bulb garden is moving to a bigger pot so roots have room. (Photo by Charlotte Ekker Wiggins)

The bulb garden is moving to a bigger pot so roots have room. (Photo by Charlotte Ekker Wiggins)

The same concept applies for whatever you want to plant this next growing season. Often when we buy plants in pots they’re jammed full of plants that can’t survive in such cramped quarters because there is not enough nutrients available through the soil.

If you want to buy a hanging plant full of flowers, check to see how many plants are in the pot and make sure there are at least two of each. Then buy a second empty pot with soil and make yourself a second hanging pot, giving your plants more room to grow.

It may take a little time for the plant roots to establish themselves in the second pot but you will have longer-lasting plants and more blooms if their roots have enough nutrients.

And yes, you can fertilize but that’s only going to last so long. Artificial fertilizers forces the plant to grow too fast. As soon as any hot weather impacts the little soil already in the pots, the plants will die for lack of both water and food.

And what about the pot for the bulb garden at the top of this story?

It’s pretty and appropriate for the bulbs in the pot, crocus surrounding the outside and tete-a-tete daffodils in the middle. The daffodil roots will grow longer so they need more soil under them. The crocus are shallow so don’t need as much soil.

If I had my druthers, though, I would give all those bulbs more root space so they can stay healthy during their growth and I can pop them outside in my garden for repeated growth later.

Charlotte